Behind the scenes of Bicep.LocalDeploy: A Developer's Guide
Learn how you can generate documentation from your model's source code

Bicep's local-deploy resources are rapidly growing, but the models developed often lag behind in documentation.
Keeping documentation in sync with code is always a struggle. As a developer, you typically start by writing the code. You create the baseHandler, define the models, and lastly, implement the handler for what you want to expose to your end-user. Only after things work, you still need to create a README.md file explaining how users can leverage the functionality.
What if your code could describe itself? And what if the documentation was generated directly from the annotations you already wrote while defining the models?
That's precisely why I wrote the Bicep.LocalDeploy library and bicep-local-docgen CLI utility. In this blog post, you will learn:
- Why
Bicep.LocalDeploywas developed. - How it works.
- How to get started.
Why Bicep.LocalDeploy
Despite its name, Bicep.LocalDeploy doesn't come out of the kitchen from the Bicep team, but it's a library and a tool for producing better documentation for your developed resources.
See, typing out documentation for Infrastructure as Code (IaC) has always been a challenging task. In the context of local-deploy resources, developers wire up the models, handlers, and outputs, and then move on. The problem? Documentation is an afterthought, often writing manually README.md files.
This creates friction. Every code change you make has the risk of drifting away from what's written in the docs.
In the C# ecosystem, this is often tackled with annotation-driven approaches. For example, attributes or decorators allow developers to enrich code with metadata that can be consumed for auto-generated documentation.
If you've written a local-deploy model before, you probably recognized that you already have defined some of this metadata:
[ResourceType("Product")]
public class Product
{
    /// <summary>
    /// Gets or sets the name of the product.
    /// </summary>
    /// <value>The product name. Cannot be null or empty.</value>
    [TypeProperty("The name of the product.", ObjectTypePropertyFlags.Required)]
    public string Name { get; set; } = string.Empty;

    /// <summary>
    /// Gets or sets the price of the product in decimal format.
    /// </summary>
    /// <value>The product price. Must be greater than or equal to zero.</value>
    [TypeProperty("The price of the product.", ObjectTypePropertyFlags.Required)]
    public decimal Price { get; set; }
}
Here's where you already have defined two key pieces that are useful for your end-users to read:
- The properties have attributes defined with a description.
- The properties
ObjectTypePropertyFlagstates whether properties are mandatory or not.
What if you could extend this while coding out your model?
That's the goal of the Bicep.LocalDeploy library: let developers annotate their Bicep properties directly in the code. From there on, the companion tool bicep-local-docgen can automatically generate consistent up-to-date documentation. The result is less time spent maintaining README.md (or any other name) files.
How it works
At its core, Bicep.LocalDeploy introduces individual annotations that can be attached directly to your model code. These annotations can describe:
- Frontmatter data, such as the category to which the model belongs.
- The first heading data.
- Provide examples.
- Custom sections.
Once those annotations are in place, the bicep-local-docgen takes over. This CLI utility scans the *.cs files, reads the annotations, and generates Markdown files. That means you don't have to write out any Markdown files yourselves. No more manual edits required.
Here's the revisited example from earlier with annotations from Bicep.LocalDeploy:
using Bicep.LocalDeploy;
using Bicep.Local.Extension.Types.Attributes;
using Azure.Bicep.Types.Concrete;
using System.Text.Json.Serialization;

namespace MyCommerce.Models.Product;

[BicepFrontMatter("category", "Commerce")]
[BicepDocHeading("Product", "Represents a product with name and pricing information.")]
[BicepDocExample(
    "Creating a basic product",
    "This example shows how to create a simple product with name and price.",
    @"
resource product 'Product' = {
  name: 'Premium Widget'
  price: 99.99
}
"
)]
[BicepDocCustom("Additional reference", @"For more information, see the following links:

- [Product Management Guide][00]

<!-- Link reference definitions -->
[00]: https://example.com/docs/products")]
[ResourceType("Product")]
public class Product
{
    /// <summary>
    /// Gets or sets the name of the product.
    /// </summary>
    /// <value>The product name. Cannot be null or empty.</value>
    [TypeProperty("The name of the product.", ObjectTypePropertyFlags.Required)]
    public string Name { get; set; } = string.Empty;

    /// <summary>
    /// Gets or sets the price of the product in decimal format.
    /// </summary>
    /// <value>The product price. Must be greater than or equal to zero.</value>
    [TypeProperty("The price of the product.", ObjectTypePropertyFlags.Required)]
    public decimal Price { get; set; }
}
Getting started
Now that you've seen the concept in action, let's walk through how to set it up yourself. Getting started is simple: add the Bicep.LocalDeploy package to your project, add annotations to your code, and run the bicep-local-docgen tool to generate the docs.
Let's do it step-by-step. I'm assuming you have the .NET SDK 9.0 or above installed:
- Create a new project file named
MyCommerce.csprojwith the following content:
<Project Sdk="Microsoft.NET.Sdk">
  <PropertyGroup>
    <OutputType>Exe</OutputType>
    <RootNamespace>MyCommerce</RootNamespace>
    <AssemblyName>my-commerce</AssemblyName>
    <IncludeNativeLibrariesForSelfExtract>true</IncludeNativeLibrariesForSelfExtract>
    <PublishSingleFile>true</PublishSingleFile>
    <SelfContained>true</SelfContained>
    <InvariantGlobalization>true</InvariantGlobalization>
    <TargetFramework>net9.0</TargetFramework>
    <Nullable>enable</Nullable>
    <ImplicitUsings>enable</ImplicitUsings>
    <AppendTargetFrameworkToOutputPath>false</AppendTargetFrameworkToOutputPath>
    <AppendRuntimeIdentifierToOutputPath>false</AppendRuntimeIdentifierToOutputPath>
  </PropertyGroup>

  <ItemGroup>
    <PackageReference Include="Azure.Bicep.Local.Extension" Version="0.37.4" />
    <PackageReference Include="Azure.Identity" Version="1.14.2" />
  </ItemGroup>
</Project>- From the project directory run:
dotnet add package Bicep.LocalDeploy.
This will add the library providing annotation attributes.
- Create a folder
Modelsand add a new file namedProduct.cs. - Copy the content from the earlier section into this file.
- Install the
bicep-local-docgenby running:dotnet tool install --global bicep-local-docgen. - Execute
bicep-local-docgen generate --source Models -vin your terminal to produce documentation.
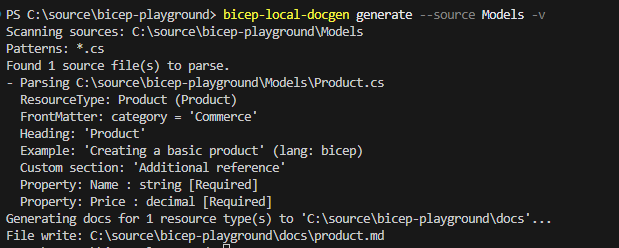
By default, the CLI utility produces files in the docs directory. You can always add the --output option to store the generated docs in a different directory. If you open the file in your favorite editor, you notice the generated docs.
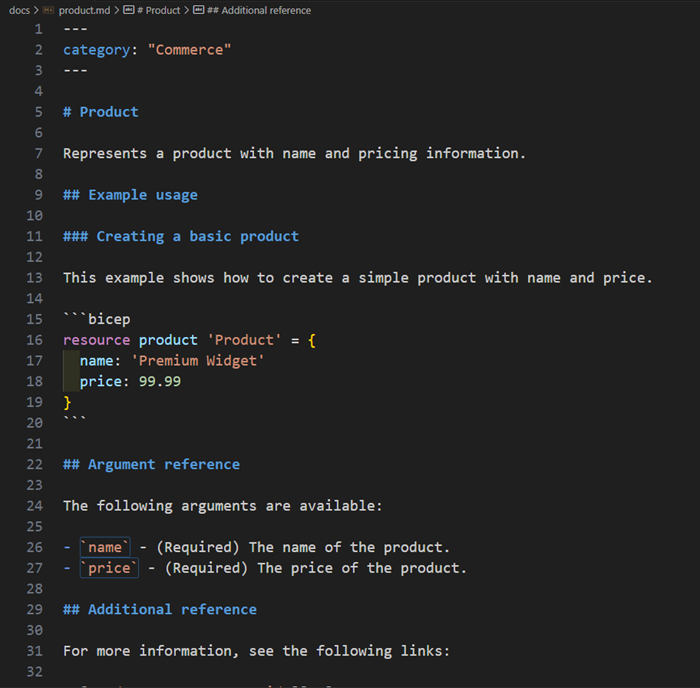
With the docs now generated, you're ready to publish them into your repository.
Key takeaways
Using the Bicep.LocalDeploy and bicep-local-docgen tool demonstrated how much easier it is to create documentation. By annotating your models and generating docs automatically, you eliminate the manual work. It also keeps your code aligned with your docs. At least, if you keep the annotations up to date, as well.
Here are the main benefits you'll notice when adopting this approach:
- Annotations simplify documentation: Adding metadata directly to your models ensures docs are always up to date.
- Automated generation: The
bicep-local-docgenwas designed on top of the library to produce Markdown documentation. - Easy setup: Simply add the NuGet package to your project and run the CLI tool.
- Flexible output: Add the annotations you want, and the tool grabs it up.
Summary
The Bicep.LocalDeploy library provides simple annotations that you can add directly next to your source code. This way, the CLI utility can read the annotations and keep your documentation up to date without requiring manual updates.
In this way, documentation also becomes standardized if you follow the same style in each model. If you wanna learn more, check out the official GitHub repository.
There are already a couple of repositories making use of this library: